- Home
- Gallery and Artists
- About BAMM
- Members Area
- Resources
- Prompts from the Pros
- Prompts from the Pros - Sophie Robins
- Prompts from the Pros - Rachel Davies - Interwoven
- Prompts from the Pros - Lawrence Payne
- Prompts from the Pros - Alex McHallam
- Prompts from the Pros 2 - Escape with Bonnie Fitzgerald
- PftP2 Francesca Busca Eco Artivism - Fabric
- PftP2 Francesca Busca Eco Artivism - Metal
- Prompts from the Pros 2 - Francesca Busca Eco Artivism - Paper
- Prompts from the Pros 2 - Francesca Busca Eco Artivism Plastic
- Prompts from the Pros 2 - Joanna Kessel
- Prompts from the Pros - Helen Miles
- Prompts from the Pros - Julie Sperling
- Prompts from the Pros - Kelley Knickerbocker
- Prompts from the Pros - Marian Shapiro
- Prompts from the Pros - Rachel Sager
- Materials & Techniques
- History of mosaic
- BAMM Talks and Demos
- Useful links and groups
- Suppliers
- Prompts from the Pros
- Workshops/Exhibitions
- News
- Supplier’s
British Association for Modern Mosaic
Prompts from the Pros - Rachel Sager
Rachel Sagar - Go Small

Step 1
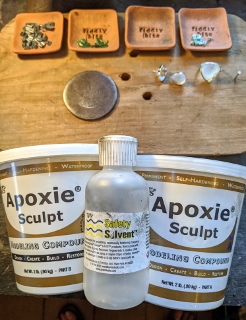
If you haven't tried Apoxie Sculpt yet, you are in for a mind blow. I say with all sincerity that it has changed my life. It's easy to use, perfect as a jewelry adhesive and archival. Once cured, it's hard as a rock. (NB In the UK Milliput is a good alternative to Apoxie Sculpt as it is easier to get.)
Note the solvent bottle, that will come in handy later.
Step 2
It's a two part epoxy but acts much like silly putty. Scoop out equal measures of part A and part B. I roll them into balls to make the comparison clear. I am not a measurer, but have heard tell of artists using teaspoons to be perfectly accurate.

Step 3
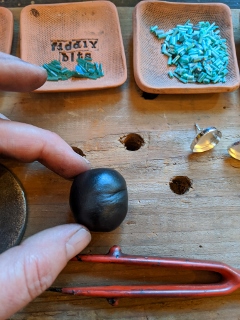
After massaging the two colors together thoroughly for a minute or so, your Apoxie Sculpt is now "active" which means you have a working time. This can be anywhere from thirty minutes to close to an hour. It sets up very slowly and it's up to you to decide when it has lost its malleability.
What I love about it's consistentcy is that your filati "sink" in and are enveloped securely. Very different feel from mortar or glue. It's addictive.
Step 4
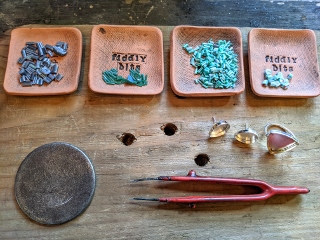
It's smart to have all your filati pre-cut and in order so you don't waste the valuable work time. I love tiny dishes to keep all the colors clearly separated.
For this session, I have a beautiful triangle ring and teardrop earrings set planned in sterling silver.
Step 5
As I confessed, I am not a measurer which means I ALWAYS am optimistic and mix too much apoxie than I can humanly use in one session. This has resulted in my coming up with ways to use the extra.
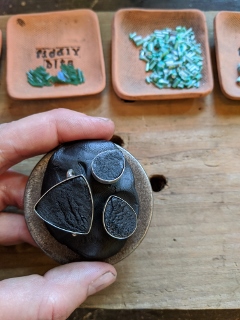
Jewelry pieces often dont like to sit comfortably on a work surface and tend to wobble around. I like to sink their posts and and ends into soft apoxie as a temporary work station. Gives me a lot of control.
Step 6
After I finish the important work of making the actual jewelry (a much longer, involved story!) I sometimes shape my leftovers into a rustic pendant base. Love my awl to poke a hole for the jump ring or string. I imprinted this one with a rubber stamp so this is the back side. Turn it over after it cures and you have a simple little "substrate" for more micro or whatever! The cool thing about this last minute shaping is that it can be whatever you want. You can paint it, mosaic it, sculpt it... whatever!

![]()
![]()