- Home
- Gallery and Artists
- About BAMM
- Members Area
- Resources
- Prompts from the Pros
- Prompts from the Pros - Sophie Robins
- Prompts from the Pros - Rachel Davies - Interwoven
- Prompts from the Pros - Lawrence Payne
- Prompts from the Pros - Alex McHallam
- Prompts from the Pros 2 - Escape with Bonnie Fitzgerald
- PftP2 Francesca Busca Eco Artivism - Fabric
- PftP2 Francesca Busca Eco Artivism - Metal
- Prompts from the Pros 2 - Francesca Busca Eco Artivism - Paper
- Prompts from the Pros 2 - Francesca Busca Eco Artivism Plastic
- Prompts from the Pros 2 - Joanna Kessel
- Prompts from the Pros - Helen Miles
- Prompts from the Pros - Julie Sperling
- Prompts from the Pros - Kelley Knickerbocker
- Prompts from the Pros - Marian Shapiro
- Prompts from the Pros - Rachel Sager
- Materials & Techniques
- History of mosaic
- BAMM Talks and Demos
- Useful links and groups
- Suppliers
- Prompts from the Pros
- Workshops/Exhibitions
- News
- Suppliers
British Association for Modern Mosaic
Prompts from the Pros - Helen Miles
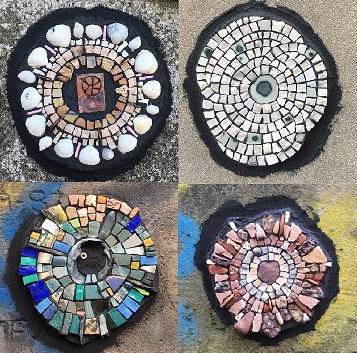
Helen Miles - Make a Mosaic 'Virus'
No one will have failed to notice that the virus which is causing such devastation and destruction is a curiously beautiful thing. The hyper-magnified version - a soft ball symmetrically dotted with red barbs, like a deadly pin cushion - swirls behind the heads of newsreaders or appears in glossy format in the front of weekly magazines. Its exotic strangeness is fast becoming imprinted on our psyches so why not use it as an inspiration to make your own mosaic ‘virus’?
This is a chance to go off-piste, to use up long-forgotten tesserae ‘stashes’, experiment with colour and texture, or to simply play with the potential of mosaic materials. If you are in lock down with children, it could also be a good project to try out with them.
Materials:
- Old apron or shirt to protect your clothes
- Plastic sheet
- Mixing tub (old soup or yoghurt pot/ice cream tub etc is fine)
- BAL Max Flex Fibre Tile Adhesive (You can get it delivered. It only comes in large bags so plan to make lots or share with your neighbours)
- Black Mortar Tone (on-line delivery)
- Spoon or mixing implement
- Mosaic mesh (available online)
- Spreading implement (an old loyalty card will do)
- An adhesive spreader or an old table knife
- Miscellaneous mosaic materials
- Ordinary kitchen scissors
- Sharpie pen
Step One.
Prepare your substrate.
- Put on your apron, lay out the plastic sheet and cut two pieces of mesh to slightly larger than the size of your ‘virus’.
- In the pre-Covid days I would recommend you put on a disposable face mask before mixing the tile adhesive. However, given that this is unlikely to be an option, please mix outside.
- Mix roughly 4-5 heaped tablespoons of tile adhesive in your mixing tub with your mixing implement by following the instructions on the packet. You are aiming for a thickish paste, like peanut butter.
- Add the Black Mortar Tone if you are using. The more you add the blacker the tile adhesive will be!
- Put one of the mesh pieces onto the plastic sheet. Spread a thin layer of adhesive over the mesh with your spreading tool/loyalty card and then lay the second mesh piece over it and spread a second thin layer. The adhesive will push through onto the plastic sheet (that’s fine) and bits of the mesh will still be visible (that’s also fine).
- If you have the space, it’s a good idea to make lots of these DIY substrates in one go.
- Clean your tools.
- Wait for the adhesive to dry completely – preferably 24 hours - and peel the mesh away from the plastic sheet.
- You will now have a flexible light weight substrate ready for mosaicking.
Step Two
Designing Your Mosaic Virus
While your substrate is drying decide what tesserae you are going to use and work out a rough idea of how you plan to lay them.
Working with tile adhesive means that once you have laid a piece it is hard to make changes so it’s a good idea to think ahead.
Lay out your idea on a board or table.
Ideas include:
- Play with mixing or contrasting colours or textures
- Perhaps choose a favourite tessera as the centre and work out from there. If you want it to stand out, use flatter or less interesting tesserae around it so they don’t distract the eye away.
- Graduate tones working from dark to light or visa versa, mixing unusual materials.
- Choose a single colour and see how many different materials and textures you can find within or near that colour band.
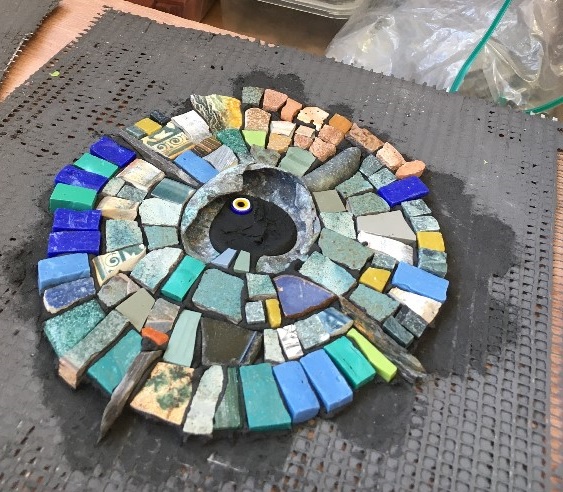
Step Three
Making Your Mosaic ‘Virus’
- Mix a second batch of tile adhesive as before.
- Spread a thick layer onto the pre-prepared mesh base using the adhesive spreader or old table knife. You want your tesserae to be embedded up to 2/3 their depth, so vary the thickness of the layer accordingly.
- Don’t spread too much at once - roughly the size of a mug base should be enough to start with.
- Press your tesserae into the adhesive.
- Spread more adhesive as needed, working outwards from the centre and turning the substrate as you go so you build up your design evenly.
- Clean your tools and leave to dry – again preferably for 24 hours.
- Once dry, cut the excess mesh away.
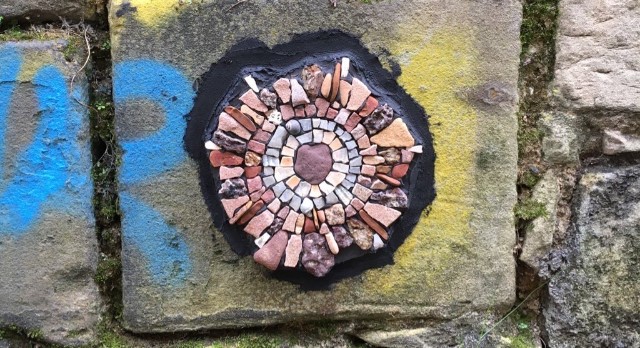
Step Four
Install Your Mosaic ‘Virus’
- Find a clean, flat, dry surface where you would like to install your virus – a garden wall, bathroom, or side of the garage!
- Prepare another batch of tile adhesive as above.
- Hold the mosaic up to the surface where you plan to install it and draw around it with your Sharpie pen so you are left with the outline of the mosaic on the wall.
- Spread the tile adhesive onto the wall/surface filling the outline you have just drawn. The adhesive should be reasonably thick so that it can hold the weight of the mosaic.
- Press the mosaic into the adhesive and continue to hold it in place for a few minutes so that you are sure it is stuck. Use excess adhesive to fill the gap around the edge of the mosaic so that it is neatly embedded all the way around.
![]()
![]()